
Table of Contents
Installing Node js on Mac is simple, and I’ll guide you through the easiest ways to get it up and running. Whether you’re a seasoned developer or new to JavaScript frameworks, these methods will help you set up Node.js effectively.
Recommended Methods
There are several methods to install Node.js on Mac OS, but the developer community favors some due to their ease of use and flexibility:
1. Using the Node Version Manager (NVM): This allows you to switch between Node versions per project, which is invaluable in managing multiple development environments.
2. Using the Homebrew: The simplest and most straightforward method for users who need a stable working environment across various applications.
3. Download the Official Installer website: This is best for those who prefer using the packaged installer directly from the Node.js website, especially in environments where multiple version management is unnecessary.
Prerequisites
Before installing Node.js, ensure your Mac OS is up-to-date, and you have admin access to install the software. You may also need to install Xcode and the Xcode Command Line Tools necessary for compiling native addons.
1. Installing Node js on Mac OS using Node Version Manager (NVM)
Why Choose NVM?
NVM is highly recommended because it lets you switch between Node.js versions effortlessly, which is very handy as new versions and updates come out frequently. This flexibility is beneficial if you’re juggling multiple projects that may require different versions.
How to Install Using NVM:
The simplest method to set up an NVM is through Homebrew. Rather than directly installing Node.js using Homebrew, you will use it first to install NVM. After NVM is installed, you can then use it to install any Node.js version you require.
Step 1: Open your terminal and install NVM using Homebrew with the command:
brew install nvm
Step 2: On-screen Instructions: Follow the Homebrew instructions to set up NVM:
- Create a .nvm directory for NVM
mkdir ~/.nvm- Add the following lines to your shell configuration file (like .zshrc)
export NVM_DIR="$HOME/.nvm"
[ -s "/opt/homebrew/opt/nvm/nvm.sh" ] && \. "/opt/homebrew/opt/nvm/nvm.sh" # This loads nvm
[ -s "/opt/homebrew/opt/nvm/etc/bash_completion.d/nvm" ] && \. "/opt/homebrew/opt/nvm/etc/bash_completion.d/nvm" # This loads nvm bash_completion
Step 3: Select a version.
Once NVM is installed, you can install any version of Node.js. It is recommended that the most recent Long Term Support (LTS) version of Node.js be installed. Opting for the current LTS version over the latest release is beneficial because LTS versions receive extended support and maintenance. This approach helps avoid issues with new features in the latest releases that may not be compatible with earlier versions. Run a simple command like
nvm install --lts
Step 4: Verify the installation. Now, verify that it has been installed and is configured to the correct version.
$ node -v
v16.15.0
2. Installing Using Homebrew Directly
Benefits of Homebrew: Homebrew handles dependencies and updates smoothly, simplifying the installation and maintenance of software packages on Mac OS.
Simpler for Beginners: If you’re new to Node.js, you might like a simple setup. Homebrew lets you install Node.js directly without having to deal with different versions.
Step-by-Step Installation Process: To install Node.js via Homebrew, you must run a command in your terminal. This command installs Node.js and NPM (Node Package Manager), allowing you to start working with node immediately.
Installation Command
- Open your terminal.
- If you don’t have Homebrew installed, you can install it by running:
/bin/bash -c "$(curl -fsSL https://raw.githubusercontent.com/Homebrew/install/HEAD/install.sh)
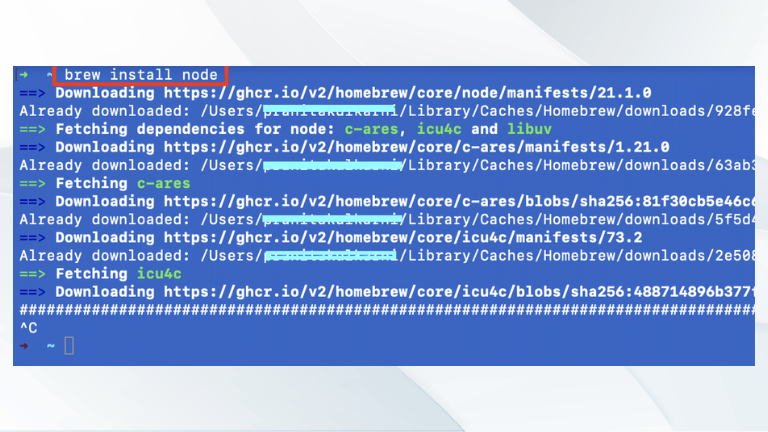
- To install Node.js and NPM, execute:
brew install node
- Check Your Installation: Then, check that you have it installed.
node -v
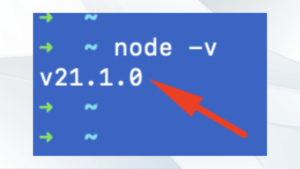
npm -v

These commands should display the version numbers of Node.js and NPM installed on your machine.
Looking to Effortlessly Boost Your Node.js Project?
Equip your team with exceptional Node.js expertise. Bring our skilled Node.js Developer on board for your projects now!
3. Installing Using the Official Installer
For those who prefer official sources:
This final method of installing Node.js is the most popular. It’s ideal if you prefer an official source and want to avoid using a package manager.
How to do it:
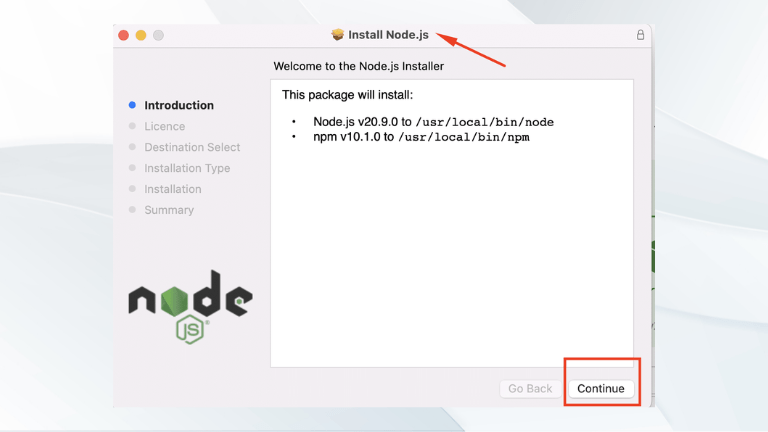
- Visit the Node.js official website.
- Download the latest LTS version installer.
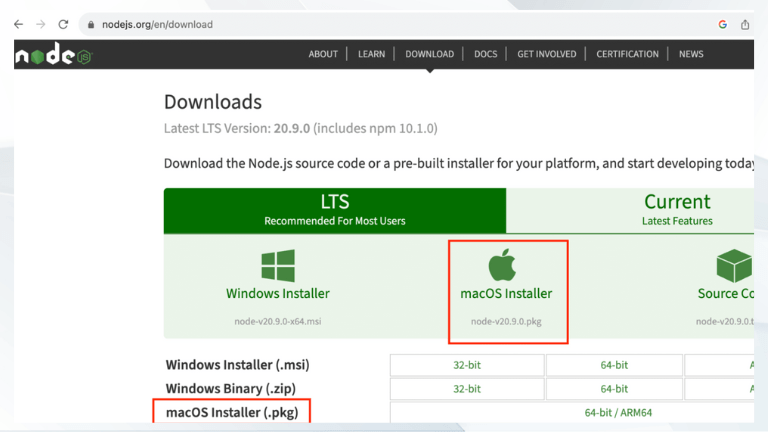
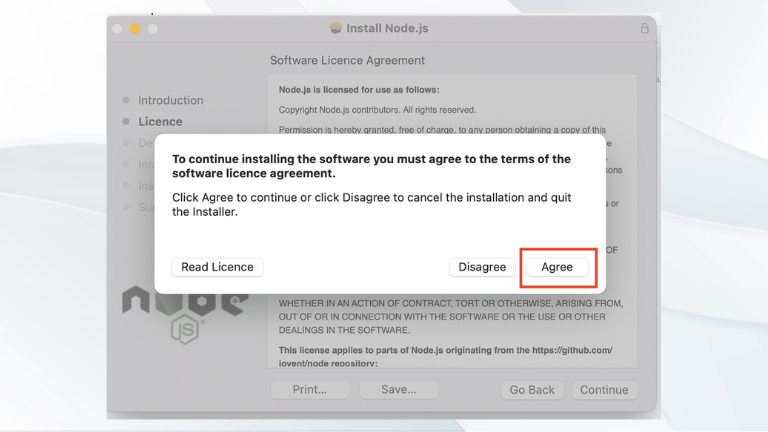
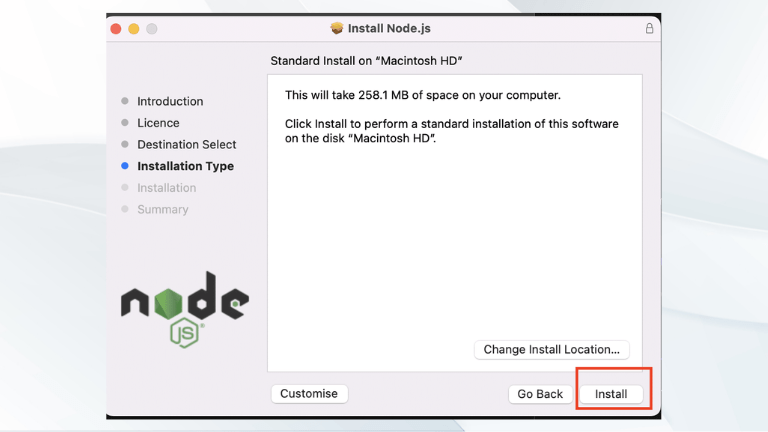
- Run the downloaded .pkg file and follow the on-screen setup instructions.
Click Continue on the introduction screen.
Click Agree to the license agreement.
Now, choose your installation type and location and click Install.
Now, at the end you’ll be asked for your password to authenticate the installation process. Close the installer when it finishes.
Verify the installation:
After the setup instructions, check your terminal to ensure that it is installed.
$ node -v
v16.15.0
Troubleshooting Common Issues
Sometimes, you might encounter issues related to permissions or conflicting versions. It’s helpful to:
- Check the system path.
- Ensure there are no conflicting installations.
- Run diagnostic commands like “` which node “` to understand which version is currently active.
Conclusion
Throughout this guide, I’ve detailed various methods for installing Node.js on Mac OS, catering to different developer needs. For those who frequently work with Node.js or JavaScript and require the flexibility to switch between different versions for project compatibility, using Node Version Manager (NVM) is the most advantageous approach. This is particularly useful as Node.js is often updated, and different projects may require different versions.
Comparing the Methods:
- NVM: Offers the most excellent flexibility, allowing developers to switch between Node.js versions seamlessly. This is crucial for maintaining compatibility across various projects.
- Homebrew: Provides convenience by simplifying the installation process, which is ideal for those new to Node.js or those who prefer a more straightforward approach.
- Official Installer: Delivers the simplest, most direct installation method, appealing to those who prefer to use official sources without intermediary tools.
Best Practices:
Regularly update your Node.js installation to the latest version to ensure optimal performance and security. This will help you leverage new features and stay protected with the latest security patches. Additionally, becoming proficient with npm will significantly enhance your ability to efficiently manage your project’s dependencies.
Each installation method presents flexible options tailored to the developer community’s expertise and needs. Whether you require the ability to frequently switch versions, seek an easy entry point, or prefer sticking to official sources, there is a suitable method for everyone. Choose the method that best aligns with your workflow to effectively get started with Node.js on your Mac.
Frequently Asked Questions
There are three main methods for installing Node.js on Mac OS:
- Using the Node Version Manager (NVM). This is the most recommended method as it allows you to switch between Node.js versions easily.
- Using Homebrew. This is a simpler method that is a good choice for beginners.
- Downloading the official installer from the Node.js website. This is a good option for those who prefer to use an official source.
The best method for you will depend on your needs.
- If you frequently work with Node.js and need to switch between versions, then NVM is the best option.
- If you are new to Node.js and prefer a simple installation process, then Homebrew is a good choice.
- If you prefer to use an official source and avoid using a package manager, then downloading the official installer is the best option.
NVM allows you to easily switch between different versions of Node.js. This is important because different projects may require different versions of Node.js.
The method for updating Node.js will depend on the method you used to install it.
- If you used NVM, you can update Node.js by running the following command:
Bash
nvm install node - If you used Homebrew, you can update Node.js by running the following command:
Bash
brew upgrade node
- If you downloaded the official installer from the Node.js website, you will need to download and run the latest installer.
You can check the Node.js version on Mac by running the following command:
Bash
node -v
npm is typically installed automatically when you install Node.js. However, if you need to install npm separately, you can do so by running the following command:
Bash
npm install -g npm
npm is typically installed automatically when you install Node.js. However, if you need to install npm separately, you can do so by running the following command:
Bash
npm install -g npm
The method for uninstalling Node.js will depend on the method you used to install it.
- If you used NVM, you can uninstall Node.js by running the following command:
Bash
nvm uninstall node
- If you used Homebrew, you can uninstall Node.js by running the following command:
Bash
brew uninstall node
- If you downloaded the official installer from the Node.js website, you can uninstall Node.js by moving the Node.js application to the Trash.
npm is typically uninstalled automatically when you uninstall Node.js. However, if you need to uninstall npm separately, you can do so by running the following command:
Bash
npm uninstall -g npm
Share the knowledge
You May Also Like
Ready to take plan? It’s just
a matter of one click
Things go wrong have questions. We’ve understand. So we have people
or give us a call: (252) 365-2280